Why Purpose-Led Branding in India Is Winning Consumer Trust in 2026
Why Purpose-Led Branding in India Is Winning Consumer Trust in 2026 Purpose-led branding in India is winning trust because Indian...
Read More → 
THE BEST MARKETING CONSULTANT IN DELHI
If you’ve never booked a professional product shoot before, the biggest surprise is usually how much happens before the camera even comes out. A proper product photography Delhi session isn’t someone snapping a few shots against a white sheet — it’s a structured process covering lighting, styling, angles, and post-production, built specifically for how your product will be used: Amazon listing, Shopify store, Instagram feed, or a print catalog. Knowing what that process actually looks like helps you prep faster, avoid reshoots, and get usable files on the first try.
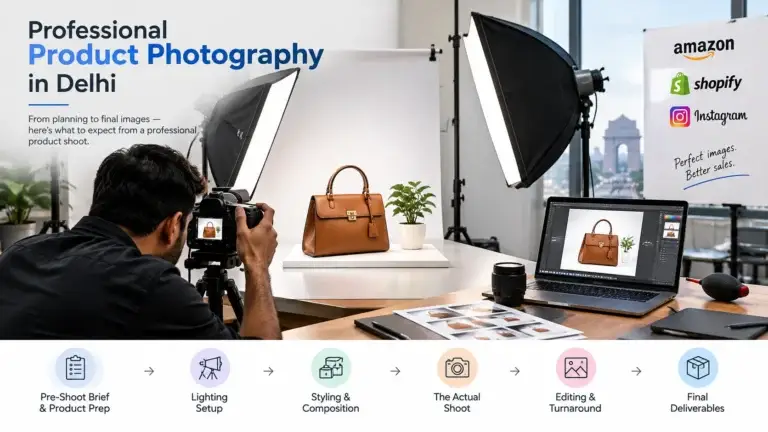
A lot of sellers assume the camera or the studio backdrop is what separates amateur photos from professional ones. In practice, it’s the process. Two studios can use near-identical gear and still produce very different results, because the difference lives in how lighting is set, how the product is styled and positioned, and how much care goes into editing afterward. If you’re comparing studios or freelancers in Delhi, ask about their process before you ask about their camera model.
Before any shoot day, a good studio will ask a few specific questions:
This stage also covers product prep — steaming garments, cleaning glass or metal items, checking for dents or scratches on packaging, and flagging anything (like reflective surfaces or transparent liquids) that will need extra lighting attention. Skipping this step is the single biggest reason shoots run long or need reshoots.
This is where most of the actual “look” of your images gets decided. In a controlled ecommerce photography studio, lighting is usually built around a few standard setups:
Reflective products (bottles, watches, jewellery) and matte or dark products (leather, electronics) need different lighting treatment entirely — a setup that works for one will often wash out or under-expose the other. This is usually tested with a couple of trial shots before the full run begins, so exposure and color are locked before shooting all your SKUs.
Styling covers everything that isn’t the product itself but affects how it reads in the photo — props, backdrop choice, folding or draping for apparel, and consistent angles across a catalog so your listing doesn’t look like it was shot on three different days. For marketplaces like Amazon or Flipkart, this also means following their specific image requirements: pure white background, minimum resolution, product filling a set percentage of the frame, and no extra text or watermarks on the main image.
For lifestyle or Instagram-first brands, styling shifts toward context — a skincare bottle next to a towel and a plant, a bag shot in natural light on a textured surface. The brief from Step 1 determines which direction the shoot leans.
With lighting and styling locked, the shoot itself tends to move fast — this is usually the shortest part of the whole timeline. Expect multiple angles per product (front, 45-degree, back, close-up on detail or texture), and often a few “safety” shots at slightly different exposures so the editor has options later. For apparel or larger items, this stage may also include a change of props or backdrop between SKUs if your brief calls for variation.
Raw shoot files are rarely the final image. Editing typically covers:
Editing turnaround varies by studio and order size, but a realistic range for a mid-sized product batch is a few business days rather than same-day delivery — same-day is usually only realistic for very small batches. If a studio promises instant turnaround on a large SKU count, ask how, since rushed editing is where color inconsistency and background artifacts tend to creep in.
At handover, you should expect to receive:
If any of these aren’t specified upfront, ask before the shoot — not after you’ve received a zip file of unlabeled JPEGs.
Most marketplaces expect 5–7 images per SKU: a clean white-background hero shot, multiple angles, a close-up on detail or texture, and often a size or scale reference. Requirements vary slightly by platform, so check your specific marketplace’s image guidelines before finalizing the shot list.
Yes, but it needs to be planned at the brief stage. White-background marketplace shots and styled lifestyle shots use different lighting and composition, so combining both in one session means allocating time and setup changes for each style rather than assuming one setup covers both.
For accurate color, texture, and packaging representation, physical products are strongly preferred. Reference photos or renders can work for certain digital-first categories, but for anything sold on a marketplace with strict return policies around product accuracy, a physical product shoot is the safer route.
This depends on batch size and the studio’s current workload — it’s worth asking for a specific timeline against your SKU count rather than assuming a fixed number, since a 20-product shoot and a 200-product shoot don’t move at the same pace.
Shoot duration depends heavily on SKU count and how many angles or variants each product needs, but the lighting and setup stage usually takes longer than the shooting itself. Once lighting is locked for a category of products (say, all bottles or all apparel), shooting additional SKUs in that same setup moves much faster than the first one.
A white-background shot isolates the product against a pure white or transparent backdrop — this is the standard requirement for marketplace listings like Amazon and Flipkart. A lifestyle shot places the product in a styled scene or context (on a table, being used, alongside props) and is built for websites, social media, or ads rather than marketplace compliance.
Yes. Amazon, Flipkart, and Myntra each have their own rules around background color, minimum resolution, how much of the frame the product should fill, and whether text or logos are allowed on the main image. A shot that passes on one platform can get flagged or rejected on another, so it’s worth confirming specs per platform before the shoot rather than after.
Not directly — if packaging, labeling, or branding changes, the product in the photo no longer matches what’s on shelf or in the listing, which can cause return or compliance issues on marketplaces. A fresh shoot (even a shorter one) is usually needed whenever packaging changes materially.
Flag this at the pre-shoot brief stage. Glass, metal, glossy plastic, and liquids need specific lighting adjustments — usually backlighting or diffused softbox setups — to avoid harsh reflections or blown-out highlights. Trying to fix this only in editing rarely gives a clean result compared to lighting it correctly during the shoot.
For consistency, shooting related SKUs (same category, same lighting needs) in one session works best, since lighting and color settings stay locked across the batch. Splitting a single product category across multiple days increases the risk of small inconsistencies in exposure or color between images.
If you’re planning to list on Amazon, Flipkart, or your own website and want images that are shot and edited specifically for how those platforms actually display and rank products, it helps to work with someone who handles the full process end to end — not just the shoot day. You can see how this fits into a complete Product Shoot Services setup, or reach out directly to talk through your catalog size and timeline.
Ritwik Sachdeva | ritwiksachdeva.in | 9289626386